Introduction and Requirements for windows 7 and requirements for 64bit version of windows 7
Introduction
Hi
guys, welcome to my blog, in this blog i am going to show you how to
download and install Windows 7 Ultimate and make it Genuine. Just
correctly follow the steps found in this blog and Genuine Windows 7
Ultimate will be all yours.
The first step is to check whether your computer supports windows 7, check it:-
Windows 7 Requirements
The minimum computer hardware requirements for running Windows 7 are:
· 1GHz or faster,32-bit (x86) or 64-bit (x64) processor
· 1GB RAM (32-bit) / 2GB RAM (64-bit)
· 16GB available disk space (32-bit) / 20GB (64-bit)
· DirectX 9 graphics processor with WDDM 1.0 or higher driver
NOTE:-A
computer satisfying only minimum computer hardware requirements will
not be able to run Aero effects such as display window transparencies
and other animations.
Your just one step behind downloading Windows 7,
It is to check which version of windows 7 ultimate will support your computer.
Most
of the computer processors support 32bit. So, if you want 32bit
version, their is no need to check for compatibility meaning your
computer can run 32bit.
But some users want to use 64bit
operating system because in 64bit OS you have more ram than 32bit(32 bit
max ram is 4GB, but 64bit is more than that about 16gb).
These users need to check whether their computer processor support 64bit OS.
To check this,
Install
and run Securable, it will tell you whether you can run 64bit OS. If
you get the 64 max bit length, then yes your processor supports 64bit
Version of Windows 7 Ultimate. Download it at:-
http://www.grc.com/securable.htm
Introduction
Hi
guys, welcome to my blog, in this blog i am going to show you how to
download and install Windows 7 Ultimate and make it Genuine. Just
correctly follow the steps found in this blog and Genuine Windows 7
Ultimate will be all yours.
The first step is to check whether your computer supports windows 7, check it:-
Your just one step behind downloading Windows 7,
It is to check which version of windows 7 ultimate will support your computer.
Most of the computer processors support 32bit. So, if you want 32bit version, their is no need to check for compatibility meaning your computer can run 32bit.
But some users want to use 64bit operating system because in 64bit OS you have more ram than 32bit(32 bit max ram is 4GB, but 64bit is more than that about 16gb).
These users need to check whether their computer processor support 64bit OS.
To check this,
Install and run Securable, it will tell you whether you can run 64bit OS. If you get the 64 max bit length, then yes your processor supports 64bit Version of Windows 7 Ultimate. Download it at:-
http://www.grc.com/securable.htm
The first step is to check whether your computer supports windows 7, check it:-
Windows 7 Requirements
The minimum computer hardware requirements for running Windows 7 are:
· 1GHz or faster,32-bit (x86) or 64-bit (x64) processor
· 1GB RAM (32-bit) / 2GB RAM (64-bit)
· 16GB available disk space (32-bit) / 20GB (64-bit)
· DirectX 9 graphics processor with WDDM 1.0 or higher driver
NOTE:-A
computer satisfying only minimum computer hardware requirements will
not be able to run Aero effects such as display window transparencies
and other animations.
Your just one step behind downloading Windows 7,
It is to check which version of windows 7 ultimate will support your computer.
Most of the computer processors support 32bit. So, if you want 32bit version, their is no need to check for compatibility meaning your computer can run 32bit.
But some users want to use 64bit operating system because in 64bit OS you have more ram than 32bit(32 bit max ram is 4GB, but 64bit is more than that about 16gb).
These users need to check whether their computer processor support 64bit OS.
To check this,
Install and run Securable, it will tell you whether you can run 64bit OS. If you get the 64 max bit length, then yes your processor supports 64bit Version of Windows 7 Ultimate. Download it at:-
http://www.grc.com/securable.htm
Activation:-
Visit this to know the process of activation and link for the activators (you will find the activator link in the description):-http://www.youtube.com/watch?v=lpPjOisWYHk
IMPORTANT
If non-genuine message appears still after using activator:-
Go
to control panel, and select windows update, choose to view available
update, and scroll through the list. Find kb971033 and choose
uninstall. Then run removewat.exe and then loader.exe.
NOTE:-
If you like to have windows to update automatically and in the windows
update center you have set the update option to "Update Automatically",
then make sure that you have deselected the update KB971033, so that
KB971033 is not installed.
Download Link
That's it, you are ready to go...
Download Link
Windows 7 Ultimate 32 bit:-
Windows 7 Ultimate 64 bit :-
That's it, you are ready to go...
Download Link
Windows 7 Ultimate 32 bit:-
Download Link
Windows 7 Ultimate 32 bit:-
Windows 7 Ultimate 64 bit :-
Installation intructions
Steps of installation :-
You can simply extract the downloaded iso file and put it into a pendrive, and then directly run the windows 7 setup by clicking on the setup.exe ( you will find this folder when you extract the iso file ).
NOTE:- This method does not works for users having installed windows 7.
Alternate method:-
1. Open Power ISO, click on "Open" option as shown in the picture below, then select the downloaded file which is named as 'windows7ultimate.iso'. Insert an empty dvd, and click on the burn button as shown the picture below to successfully burn the windows 7 files into the dvd.
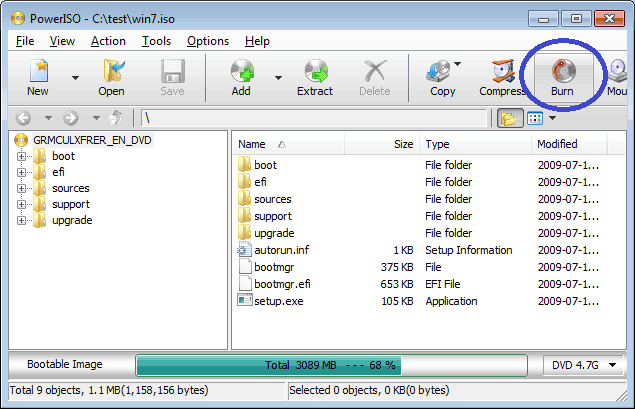 |
| Image locating the 'burn' option in Power ISO. |
2. Once the burning is completely done, your computer will eject the dvd indicating you that burning has successfully done. But don't take that disk off, insert that dvd into your computer.
3.In start-up press Del or F2 or F8 ( depends on your computer main board ) and you'll enter BIOS.
In BIOS make sure that in boot manager, the settings is set to boot from the disk.
Please find a video online to know how to set dvd drive has a first preference in bios menu.
In BIOS make sure that in boot manager, the settings is set to boot from the disk.
Please find a video online to know how to set dvd drive has a first preference in bios menu.
 |
| BIOS |
4. You will be asked to "Press any key to boot from disk...” press a key in your keyboard (eg:- click on enter button to continue) and the Windows 7 Setup will begin.
 |
| Your computer shows this message when you insert your windows 7 containing dvd. |
5. Choose your install language configuration, Time and currency format, Keyboard or input method. Then click "Next".
6. Click "Install Now".
 |
| Image showing the install now button in windows 7 installation |
7. Choose whether you want to install the x86 (32-bit) or the x64 (64-bit) version of Windows 7 Ultimate, and click "Next".
8. Click 'I accept the license terms' in 'Please read the license' then click Next.
9. Choose whether you want to "Upgrade" or "Custom" install.
 |
| Windows 7 Upgrade or Custom options |
10. Choose Partition in installation, if your computer has only one hard disk, it will be easy for selection, but if it has two or more hard drive, you will have to consider which Partition to choose meaning which hard drive you want to install windows 7.
 |
| Choose a Partition |
11. Wait for Installing Windows to progress. Your computer might be restarted during the process.
 |
| Windows 7 Installation Progress |
12.Type you’re user account and computer name. After click Next.
13.Type a password for your account, you can also Type a password hint to help in case of forgetting the password in the future, and then click Next.
14.It will ask for a serial code, skip it by selecting the "next" button without entering the serial code.
15.Set up your Time zone then click Next.
16.Choose an option from 3 choices: Public Network, Work Network, Home Network.
Thank for visiting this blog.
Please like and share this blog.


